به پاسخ دوم لینک مراجعه کنید.

\begin{frame}[allowframebreaks,noframenumbering]
	%    \frametitle{منابع}
%\printbibliography
\begin{latin}
\bibliographystyle{IEEEtr} % ieeetr-plain=unsrt
\scriptsize
\setLTRbibitems
\bibliography{REF}
\nocite{*} % to add all reference in bib
\end{latin}
\end{frame}
۲۶
ارديبهشت
در preamble کد زیر را وارد کنید:
insert this code in preamble:
\renewcommand{\algorithmname}{الگوریتم}
۲۶
ارديبهشت
و اگه خواستید با خط تیره الف و ب بگذارید:
\begin{subequations}
\renewcommand{\theequation}{\theparentequation-\protect\Alph{equation}}
\begin{align}
y & = d \\
y & = cx+d \\
y & = bx^{2}+cx+d \\
y & = ax^{3}+bx^{2}+cx+d
\end{align}
\end{subequations}
۰۲
ارديبهشت
\usetikzlibrary{positioning}
\begin{center}
%\fbox{
\begin{tikzpicture}
	\begin{scope}[
		box1/.style={draw=black, thick, rectangle,rounded corners, minimum height=0.75cm, minimum width=0.75cm}]
\draw[black,dashed,fill=red!30] (-.5,-3.2) rectangle (3.2,.5);
\node[box1, fill=green!30] (c1) {};
\node[box1, fill=green!30, right=.125cm of c1] (c2) {};
\node[box1, fill=green!30, right=.125cm of c2] (c3) {};
\node[box1, fill=green!30, right=.125cm of c3] (c4) {};
\node[box1, fill=green!30, below=.125cm of c4] (c5) {};
\node[box1, fill=green!30, left=.125cm of c5] (c6) {};
\node[box1, fill=green!30, left=.125cm of c6] (c7) {};
\node[box1, fill=green!30, left=.125cm of c7] (c8) {};
\node[box1, fill=green!30, below=.125cm of c8] (c9) {};
\node[box1, fill=green!30, right=.125cm of c9] (c10) {};
\node[box1, fill=green!30, right=.125cm of c10] (c11) {};
\node[box1, fill=green!30, right=.125cm of c11] (c12) {};
\node[box1, fill=green!30, below=.125cm of c12] (c13) {};
\node[box1, fill=green!30, left=.125cm of c13] (c14) {};
\node[box1, fill=green!30, left=.125cm of c14] (c15) {};
\node[box1, fill=green!30, left=.125cm of c15] (c15) {};
		\end{scope}
\end{tikzpicture}
%}
\end{center}
۰۷
فروردين
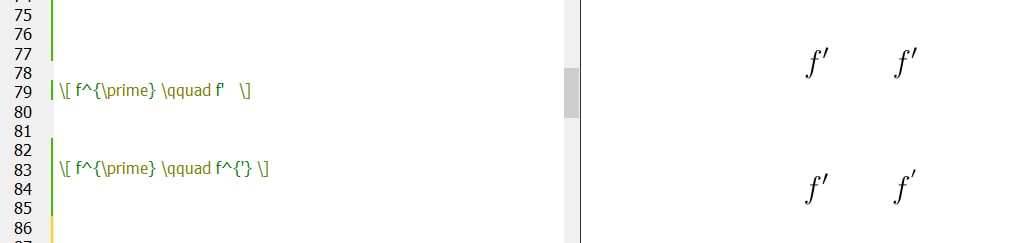
نماد پریم رو هم میتونین با دستور \prime بنویسین و هم با علامت تک کوتیشن کنار کلید اینتر. فرقی نمیکنه، منتها تفاوتشون اینه که وقتی از دستور \prime استفاده میکنید باید حتما علامت توان (^) رو براش بذارین اما تک کوتیشن (') دیگه قبلش علامت توان نمیخواد. تو عکس، تفاوتشون کاملا مشخصه. توی خط اول دوتا روش کاملاً معادل هستن و از هر کدوم استفاده کنید درسته.
۲۸
اسفند
به این منظور میتوانید از دستور \stackrel{}{} استفاده کنید. مثلاً:
\documentclass[preview]{standalone}
\usepackage[utf8]{inputenc}
\usepackage{amsmath}
%% Or a small wrapper: \newcommand{\approxtext}[1]{\ensuremath{\stackrel{\text{#1}}{\approx}}}.
\newcommand{\approxtext}[1]{\ensuremath{\stackrel{\text{#1}}{\approx}}}
\begin{document}
    $\displaystyle
        A \stackrel{\text{text}}{\approx} B
    $,
    $\displaystyle
        A \approxtext{test} B
    $
\end{document}
داریم:

۲۶
اسفند
استفاده از \autoref برای رفرنس دادن به قضیه ها و گزاره ها و تعریف ها که همشون از محیط theorem استفاده میکنن، گاهی وقتا مشکل درست میکنه و خروجی درست نمیده..یک راه حل استفاده از \cref هست که مزیتهایی نسبت به \autoref داره
پکیج cleveref یک ماکروی \cref رو فراهم آورده که حتی هوشمندانه تر از \autoref است. به عنوان مثال، می تواند چندین آرگومان داشته باشد. علاوه بر این، \cref بهتر از \autoref است که بفهمد وقتی چندین محیط یک شمارنده مشترک دارند، از کدام برچسب استفاده شود، همانطور که در مورد تعریف، قضیه و لم وجود دارد.
برای سازگار کردن این بسته با زیپرشین فقط کافیه از کد زیر توی preamble استفاده کنید.
\crefname{theorem}{قضیهی}{قضیههای}
یا
\crefname{theorem}{توجه}{توجههای}
۲۰
اسفند